Last month, we covered the different causes of speaker malfunction. If a system is not protected properly, it can lead to a lot of money spent on speaker repair bills that could have been easily spent on other things, such as a good system limiter. But even with the best system limiter in the world, if the system is not set up properly the consequences can be just as bad as without one.
A combination of knowledge and resources (test equipment and documentation) are the two main factors that allow one to achieve a proper limiter setting. A couple of examples of how to do this follow, including some easy ways that do not require the extensive use of test equipment and others that are a bit more in-depth for a more accurate setting.
A good number of turnkey systems provide optimized limiter settings from the manufacturer. This article is intended for those who do not have a turnkey system and are using predictive limiting. Predictive limiting is basically a compressor with a high compression ratio and a short attack time. The threshold is set at a certain point, and any signal that goes above that is quickly reduced, thus reducing the amount of power going to the speaker and protecting it from failing.
Consider This…
The main goal in setting a system limiter properly is to allow the maximum amount of power to the speaker while protecting it from damage. There are many variables to consider while doing this and many different ways to do it. This subject falls under the category of, "ask 100 sound guys one question and get 100 answers."
Speakers have different ratings – continuous, program, peak, etc. These ratings give a good ballpark of what the speaker can handle. With that said, I have seen speakers handle more or less than the specified rating. An important thing to keep in mind is the relation of amplifier output to what the combined speaker impedance is (what impedance the drivers are and how many of them are on an amplifier channel). Most current pro audio amplifiers are designed to operate all the way to 2 ohms (and some even 1ohm!), but most are most efficient at 8 and 4 ohms.
Another important thing to consider is the port tuning frequency of an enclosure, assuming the enclosure is ported. This is one of the many things that a manufacturer takes into consideration when publishing a recommended limiter setting, and why it is always recommended to follow the manufacturer's specifications when setting a system limiter. Vented box designs are a great way to extend the low frequency limitations of a loudspeaker. A box's tuning frequency is determined by many things, but it is kind of a balancing act to get the most amount of output while extending the low frequency response as much as possible.
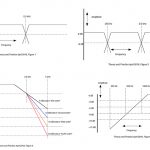
A speaker's excursion response varies over frequency and is determined by the relation of speaker parameters, box volume and tuning frequency. For example, the frequency and excursion response of a vented subwoofer box is illustrated with two different porting frequencies; 40hz and 30hz. In Fig. B, notice how the frequency response extends lower as the excursion response increases as compared to Fig. A. Fig. A's frequency response does not extend down as far, but will have a higher SPL overall with the same amount of amplifier power (higher sensitivity).
So what does this have to do with setting a limiter? It just goes to show that the power handling specs are not the only parameters that need to be considered when setting a limiter. An alteration in the port tuning frequency can have a role in when the speaker bottoms out, which can cause mechanical damage. This is also why it is important when repairing a driver to put the same type of driver in the enclosure. Drivers with different specifications than the original ones can react differently.
Three Options
The first and most simplistic way to set a limiter is the "trial by fire" method, which can literally happen if you're not careful. This is done by opening the threshold of the limiter all the way up and running the system increasingly louder until you start to hear a little bit of distortion. Bring the limiter threshold down until you don't hear any more distortion (or see any clipping). This method can work, but it is not the most accurate method.
The second is to mathematically calculate the power handling of the speaker and limit the amplifier's output to that point. You can easily find formulas online that will help you do this, so I will not go into detail about it. But I will say this method is extremely accurate for finding the thermal limit of a driver. With that said, there is still a downfall in this method relating back to the excursion response. Just because the driver can handle a certain amount of power does not mean that the driver will not bottom out and cause mechanical damage, which this method does not compensate for.
The third is to actually measure the onset of power compression. Power compression is the point at which a driver gets an increasing amount of power delivered to it without getting any louder, therefore the voice coil absorbs the voltage and creates heat. Right before this point is where a limiter should be set to engage and reduce gain. There is only one device that I know of that does this. It is made by AudioControl Industrial and is called the Iasys. In short, this system not only measures the onset of power compression, but the mechanical limit as well as amplifier clipping. This device finds the point at which a driver will not get any louder and gives a read-out to adjust limiter thresholds appropriately. While this device is on the expensive side, it is possible to find an operator with a unit to help set up your system.
This article just scratches the surface when considering the variables that are at play when setting a system limiter. While there is a lot of math and test equipment involved to calculate a component's maximum limitations, good old-fashioned common sense can be used to achieve a good end result as well.
{mosimage}


