There are literally thousands of available audio plug-ins, ranging from the simplest filters to complex multi-channel surround reverbs. This month, let’s look at some commonly used plug-ins that can help you make better mixes. Best of all, you may already have some of them.
Waves IR
As the names suggest, Waves’ IR-1 and IR-L Parametric Convolution Reverbs are… convolution-type reverbs (pictured above). If you’re not familiar with convolution reverb, here’s the basic idea: unlike “synthesized” reverb, convolution reverb captures the sonic personality of a space by creating an Impulse Response of the room, a process somewhat analogous to sampling the sound of the room. Convolution reverb sounds far more natural and accurate to the original space than traditional algorithms used to create reverb, but presents two difficulties:
1: It’s highly processor intensive, and
2: Convolution reverbs may lack control over common parameters such as room size, reverb time, pre-delay and early reflections.
Waves IR addresses many of these issues, allowing for room size and reverb time control, while maintaining efficiency so that your digital mixing system’s CPU does not grind to a screeching halt. One of the great advantages of convolution reverb is that you can create and/or import your own impulse response files, enabling the plug-in to emulate real churches, halls, or even older hardware processors. (I have IR files for the Lexicon PCM70 that are absolutely wonderful.)
When you use IR, run it in an aux send/effects return configuration, not as a channel insert. Feeding it from an aux send allows you to run multiple channels (such as snare and toms) into the same IR, conserving CPU power but — more importantly — saving you the aggravation of adjusting multiple plug-ins if you decide the reverb needs to be changed (channel inserts are better used for EQ and dynamics processing). Fig. 1 (above) shows Waves IR with a slightly modified version of the stock Room preset, which works great on snare and toms. Feel free to steal my settings!
Come Here So I Can Smack(!) You
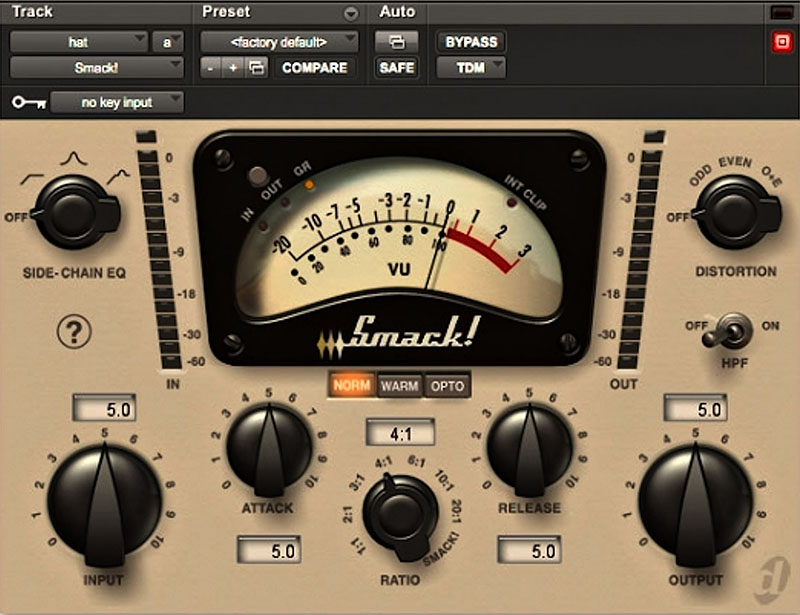
Avid’s VENUEPack plug-ins include some really useful, user-friendly processors. One of my favorites is a compressor called Smack! (shown in Fig. 2.) I often use it on lead and backing vocals, bass and occasionally on guitar. Smack! has quite a few controls, but you don’t need to address all of them to get it to sound good. You have a choice of three compression modes: Normal, Warm and Opto (my favorite) that imitate electro-optical compression. I usually use Smack! as an insert on an input channel, sometimes combined the VENUE stock channel compressor. I’ll let the stock compressor wrangle a few dB of gain reduction and then let Smack! do the same, allowing the two to combine for a higher degree of dynamic control over vocals.
Smack! has no threshold control, which may throw you for a loop, so you need to mind your gain structure when setting it. I start with the Input and Output controls at 12 o’clock and adjust the channel’s input gain. You need to watch (and listen to) the channel input meter and Smack’s meter while adjusting the gain. Sometimes you may find that the input gain is sufficient, but Smack! is not compressing. That being the case, bring Smack’s output control down a bit and raise its input control, which should induce gain reduction. Setting the attack control for a faster time can also help create more compression without cranking up the input gain.
To use the output control to achieve unity gain, bypass the plug-in and listen for a change in level. If the level is louder in bypass, raise Smack’s output control (or vice-versa) until the levels between bypass and active match. I usually set the ratio control to 3:1 or 4:1 unless I really need to grab hold of a sound, in which case I’ll go 6:1. Release time will vary with the source, so use your ears on that one. If you find you get excessive compression on low bass notes use the HPF on the side chain filter, and feel free to play with the distortion control (I don’t).
Waves H-Delay
One of my favorite delays is Waves H-Delay. It can run in three modes: mono in/mono out, mono in/stereo out, or stereo in/stereo out. I usually feed it with a mono send, bring it back in stereo to an effect return channel and set the mix control to 100 percent Wet.
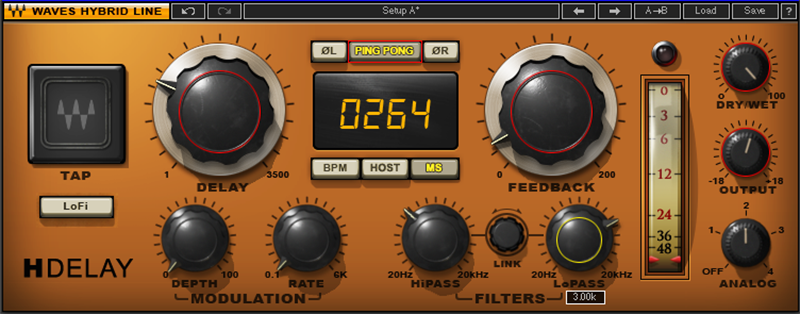
H-Delay has some features that make it easy to use, yet also allows advanced delay processing. Delay time can be dialed up in milliseconds, BPM (Beats Per Minute) or “Host.” This last setting probably won’t see much use live unless your entire show is locked to time code and/or a MIDI sequence. It enables H-Delay to derive tempo data from a host application. If you don’t want to bother with any of that, simply use the Tap button to set delay time. The Feedback knob controls the number of repeats, until you hit about 12 o’clock. If you move the Feedback control clockwise past that point, you’ll start to get a build up of repeats, and they’ll get louder (and possibly out of control!). High- and low-pass filters are provided to adjust the timbre of the delay. I typically set the HPF to roughly 250 Hz and the LPF to roughly 3 kHz. This makes the delay “smaller” and lets the delay step out of the way for the dry sound. You can achieve a similar effect by using the LoFi button. Ping Pong gives the effect some stereo width. See Fig. 3 for a setting that works well for lead vocal.
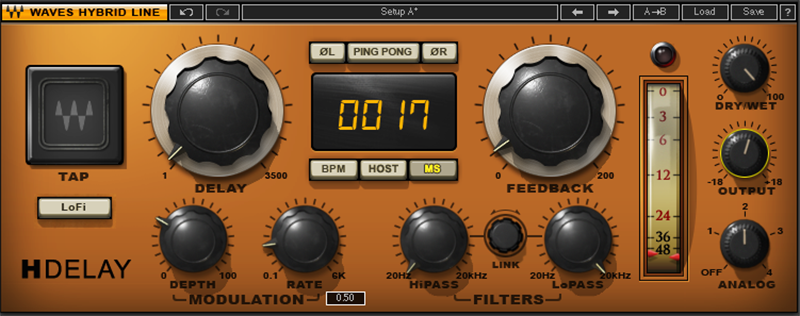
H-Delay can also generate really nice modulation effects. Fig. 4 shows settings for a chorus sound. Set the delay time between 13 and 20 milliseconds, Rate and Depth as shown, and crack open the Feedback control a bit. Add this to an acoustic guitar, and you’re in chorus heaven. Or you’ll have a heavenly chorus.
Avid Stock Pitch Shift
The stock Pitch Shift plug-in supplied with VENUE software is a great tool for fattening background vocals without adding carbs. Feed it from an aux send and return it to an effects return channel. Set the Coarse pitch to 0, the Fine pitch to 7 or 8 cents (either plus or minus will work) and add a bit (10 to 20 ms) of delay. On the effects return channel, set a HPF around 200 Hz so that the pitch shift does not cause a buildup in the lower mids. Be careful about detuning it too many cents or the vocals may sound out of tune.
Waves Sub Align
Sub Align was designed to allow engineers to correct time- and phase-misalignment between subwoofers and “top” cabinets in a P.A. system. You might ask: “Why would I need such a tool when I can simply use the system processor to fix that?” — a reasonable question. However, engineers don’t always have access to the system processor, and that’s where Sub Align comes into play.
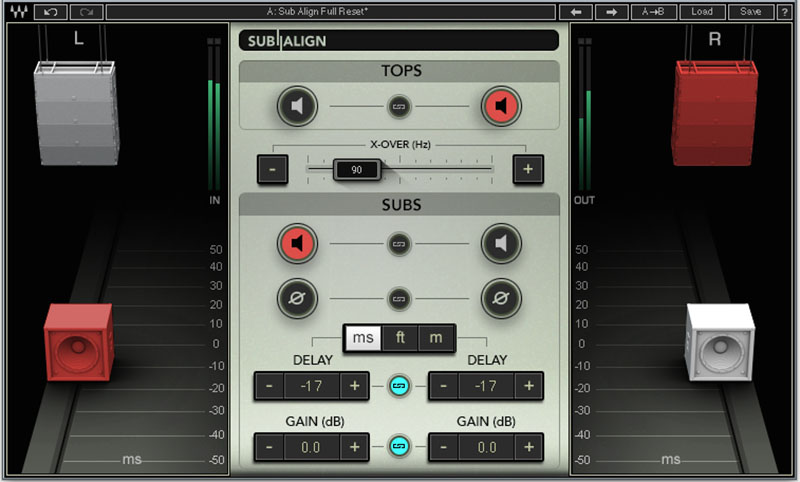
Sub Align is inserted across the main L/R mix bus and shows a pair of P.A. tops and subs (see Fig. 5). Controls are provided for Crossover Frequency, Solo (tops or subs), Phase Reverse (subs only), subwoofer delay in feet, meters or milliseconds and subwoofer gain. On-screen, you drag the sub cabinets, and as you “move” them, Sub Align calculates and applies delay to time-align the subs to the top cabinets. When the alignment is correct, the difference is clearly audible. If you tour with a P.A., you probably have access to the system processor, but on tours where you use different racks and stacks every night, Sub Align is an invaluable tool.
Steve “Woody” La Cerra is the tour manager and front of house engineer for Blue Öyster Cult.

