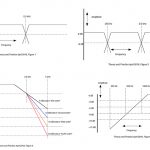
Among the more useful tools in the audio toolbox are a variety of filters. Some engineers shun the use of filters in favor of EQ, which can, of course, be very powerful, but filters are your friends and can do things that EQ can't. The three most common filters used in pro audio are high-pass, low-pass and band-pass. In case you need a refresher: a high-pass filter cuts low frequencies, a low-pass filter cuts highs, and a band-pass cuts high and low frequencies simultaneously, allowing a midrange band to pass.
High- and low-pass filters see a lot of action in miking and mixing. You rarely, if ever, see a band-pass filter on a mixing console (though you might see band-pass in a plugin); band-pass is typically used in crossovers for midrange output. Almost without exception filters cut audio and never boost audio (though some engineers refer to EQ circuits as "filters"). Notch filters are very narrow, and cut very deeply. They are generally used to kill feedback, as opposed to sculpting a sound for aesthetics.
There are a few parameters that you'll find in most filters:
Cutoff or Corner Frequency. This is the frequency at which a filter begins to roll off, specifically where audio is cut 3 dB. Why 3 dB? Three dB is the half-power point, and it's where you'll begin to hear the filter doing its job.
Slope. Slope refers to the severity of the filter, or how drastic the filter's action. We could also say it is the cutoff rate of the filter. Two high-pass filters can cutoff at 100 Hz, yet produce very different results. Slope is expressed in dB per octave. Propellerheads might describe filters as "First Order" (6 dB per octave), "Second Order" (12 dB per octave), "Third Order" (18 dB per octave) or "Fourth Order" (24 dB per octave).
The high-pass filter is the most frequently-used filter in pro audio and arguably the most important. But before we discuss applications, let's take a look at a few pics.

Fig. 1 shows the MOTU Masterworks EQ. All of the EQ bands are bypassed except for the high-pass filter. Controls for the high-pass filter are at the bottom left and include on/off, a frequency sweep knob and pushbuttons for Slope. In this screen, cutoff (shown by the white square cursor) is set to approximately 100 Hz, and slope is 6 dB per octave. What does this mean? It means that for every octave below 100 Hz, the filter cuts 6 dB.
Let's review some Audio 101. An octave is a doubling or halving of frequency. Our cutoff frequency is 100 Hz. An octave below that would be 50 Hz (50 is one half of 100). We are going down an octave because it's a high-pass filter).
Look at the curve. It's -9 dB at 50 Hz. "Wait a minute, he just said the slope is 6 dB per octave…" That's right. The curve is -3 dB at 100 Hz, and -9 dB at 50 Hz, a difference of 6 dB across the octave between 100 and 50 Hz.

Fig. 2 shows the same filter with the same cutoff frequency, but the slope has been changed to 18 dB per octave – a much steeper filter. We are still 3 dB down at 100 Hz, but when we get to 50 Hz, the curve has cut 21 dB, attenuating the low end more drastically than the 6 dB/octave filter. In fact, it's off the graph. The first Slope leaves some of the low end in our sound. The second curve cuts off the low end pretty sharply.
Listen Hear

High-pass filters (HPFs) are found on just about every mixing console (analog or digital) as well as on some microphones (see AKG C414 photo, included here). This filter is your friend; don't underestimate how helpful it can be in cleaning up your mixes.
Let's take the most obvious use: high hat – primarily a high-frequency instrument, void of much information below around 250 or 300 Hz. Typically, when we mic a high hat, we're going for a bit of presence or sizzle in the mix. We're not concerned with much below 400 or 500 Hz. This high hat mic is on a stage with a loud band, plus monitors. Low-frequency audio is omnidirectional, so even if the high hat mic is directional, it's still going to suffer leakage from (e.g.) the bass amp or even the drum wedge. In some cases, that leakage can be "friendly," but low-frequency leakage tends to be a source of trouble in controlling the mix and causes phase cancellation. If we dump the low end out of the high hat using a HPF, problems are avoided at the source, and since we don't need bottom end on the high hat anyway, nothing is missing. Filtering the low end out of the high hat mic reduces leakage from low frequency instruments; when we raise or lower the hat fader we are not also changing the level of the bass amp. Even if there is no leakage from the bass amp into the high hat mic, cutting the low end is smart because noise from the stage can be transmitted through the floor, up the stand and into the mic, creating rumbling that wastes amplifier power, causes muddy mixes and may produce audible thumping that screws up the mix when your lead singer stomps on the drum riser with his Doc Martens. I typically use the HPF on the high hat channel to cut everything below 400 Hz. If the mic has a high-pass, I'll engage that as well, and I might even cut the low-frequency EQ on the console. You might say this is using a nuclear weapon to kill a fly, but I say kill the friggin' fly. Twice.
Modestly-priced mixing desks may only provide a switch for the high-pass filter, in which case cutoff and slope are fixed based upon the manufacturer's judgment. I hope they judged well. Check the manual or use your ears. In cases where you have control over cutoff and slope, set the cutoff around 400 Hz and make the slope steep. Eighteen or 24 dB per octave will drop the low end out pretty rapidly, which is what we want for a high hat mic.
Overhead Microphones
When it comes to overhead microphones, there are two approaches. Some engineers use overhead mics just to capture the cymbals while others use them to present the overall sound of the kit and then add the close mics as "spot mics." In the former case, treat the overhead microphones like the high hat mic and dump out the entire low end. In the latter case, you'll need to listen to what happens to the sound of the toms as you change the cutoff frequency. I'd suggest you start with the high-pass filter on, set as low as it will go. While listening to the toms through the overhead mics, bring the cutoff frequency up until you start to hear the toms thin, and then drop the cutoff setting down a bit. In this case, you may want a gentle slope (6 dB/octave) so that the lowest "rumbly" frequencies get filtered out but the roundness of the toms remains.
A similar approach can be used for kick drum, rack and floor tom mics. In this day and age of engineers who mix kick like "I'm going to make you throw up your dinner," it may appear counterproductive to filter out the bottom third-octave of a kick channel, but the truth is that you have to leave room in the mix for other instruments. If your kick sounds sloppy, engage the filter and raise the cutoff until the drum tightens up. For high toms, you can probably filter below 100 Hz or so: drop this down to 50 or 60 Hz for floor toms. This clean up your mix and help reduce the possibility of infra-sonic (very low) frequencies that you can't hear from being amplified, possibly damaging subwoofers or their amplifiers. Keep this in mind for synths that are DI'd.
Multiple Benefits
Drum microphones aren't the only ones assaulted by low-frequency spill from the stage. Microphones placed on guitar amps also pickup spill from bass amps, side fills and drum fills, much of which can be remedied by a high-pass filter. But wait, there's more! A lot of the bottom end produced by a guitar rig contributes to poor articulation in the low octaves. Couple this with the typical cardioid mic's inherent proximity effect, and we have slop in the bottom end. For those of you who forgot, proximity effect is the increase in low-frequency response exhibited by most directional mics when the mic is moved closer to the source. Have you noticed where most mics end up on guitar amps? Very close to the grill, so the proximity effect will definitely be in effect. You can use the HPF to compensate for this phenomena as well as making sure that the guitar and bass are not fighting for space on the first floor of the hotel. Have your guitar player play while you listen to the amp through the PA system and adjust the filter cutoff. You'll find a sweet spot where the filter pulls out the junk yet leaves the guitar sound unharmed.
The same concept holds for vocal (and percussion) mics, especially on loud stages. Listen to your lead vocal while sweeping the cutoff frequency, and when you start to hear his or her voice thin out, back the filter down a bit. Don't look at the settings (especially the graph on a plug-in), just use your ears. You may be amazed at how high the cutoff frequency can go without thinning the vocal sound. In cases where you have a bunch of background vocals, don't be afraid to wind up the cutoff beyond the point where you hear the vocal mics thin out. This will do double-duty for you, keeping the low-end muck out of the mics as well as sculpting the backing vocals so that they can fit into your mix.
Next time we'll discuss other types of filters and how we can put them to work.


