Compression is one of the audio engineer’s most valuable audio tools. Applications for compression include protection for power amps and speakers, making instrument levels more consistent or even squashing all of the dynamic range out of a sound. But the real fun begins when you start using compression for creative effects. Back in the July 2011 issue of FRONT of HOUSE, we covered the New York Compression Trick and the idea of parallel compression (www.bit.ly/FOH-July-2011), but there are other unconventional ways to use it.
Getting on the Bus
Many engineers patch a stereo compressor across the Main L/R mix output bus, typically for one of two reasons:
(1) To protect the power amps and speakers by limiting audio output from the console, or
(2) To reap the sonic benefits of compressing the mix.
Compression can sound really nice on a stereo mix — not only smoothing out the overall level but also by adding punch (I hate that word) and impact to a mix. There are times, however, when compressing the Main L/R mix bus is counterproductive. For example, if you have a lead vocal that sits in front of the mix, it can hit the compressor’s threshold and cause the band to be “ducked” behind the singer, reducing the impact of the band.
There’s a technique called multi-bus compression that I’ve used in the studio quite a bit, and I’m starting to use it live. Multi-bus compression was developed by engineer Michael Brauer. The idea behind multi-bus compression is to avoid the undesirable side effects that often happen when you compress an entire mix. The most obvious byproduct of aggressive compression on a mix — which we’ve all heard on radio broadcasts — is the example give in the previous paragraph.
Compressing instruments in groups can avoid this kind of interaction. Let’s say that you like the sound of compressed drums. If you push the drums into compression using a comp’ on the master bus, then the lead vocal pumps. Multi-bus compression separates the drums and bass into a compressed submix and routes it back into the Main L/R mix. The vocals can be grouped separately to a different subgroup with a different compressor and perhaps EQ as well. This setup lets you selectively compress certain sounds without damaging others, or use a particular compressor for its sonic attributes on select instruments. You can do this using hardware or software.
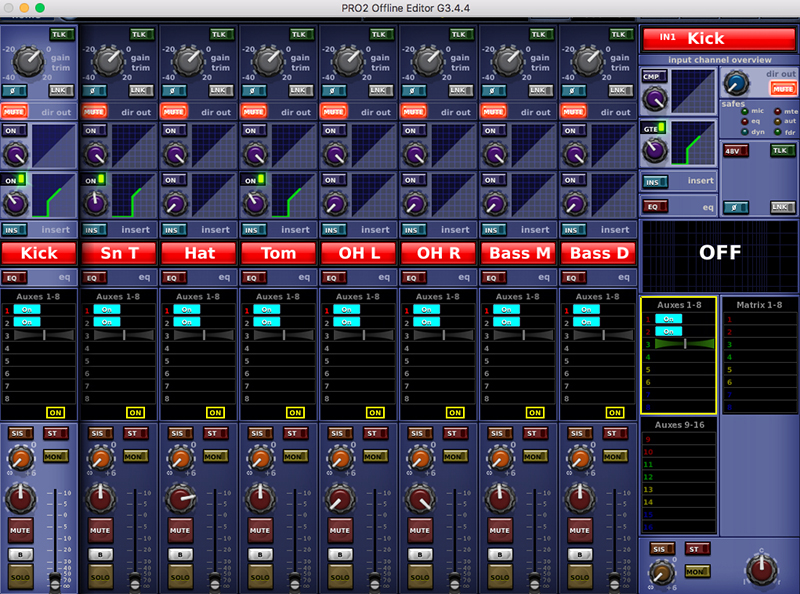
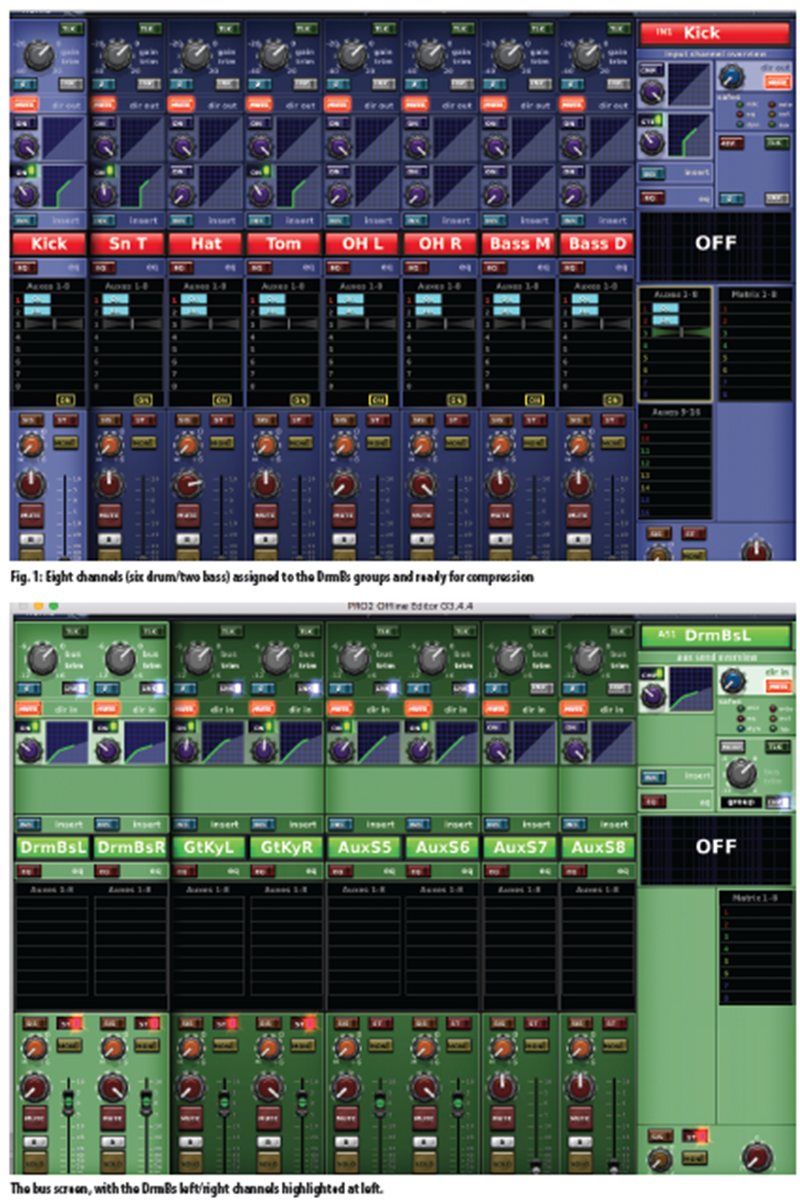
Figs. 1 and 2 show examples of multi-bus compression in a mix on a Midas PRO2 console (offline editor shown). Fig. 1 shows the input channels: six drum channels and two bass channels (BassM = mic on the bass amp; BassD = bass DI). All of these channels are assigned to the DrmBs groups, but none of them are assigned to the Main L/R bus. Note the On status for auxes 1 and 2 as opposed to aux send level.
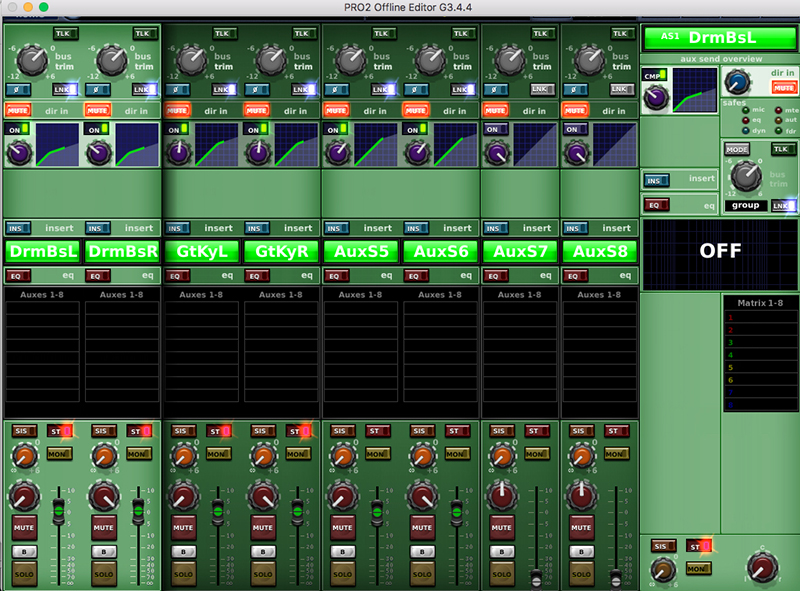
Fig. 2 shows the buses. The PRO2 allows you to set the buses to one of three different modes: Group, Mix Minus or Mix. In this example they are set to Group and that’s why the channel aux sends in Fig. 1 show On or Off as opposed to showing a fader level. Groups 1 and 2 are named DrmBsL and DrmBsR (Fig. 2). They are linked, panned left and right respectively, and assigned to the Main L/R bus. The group faders are set to unity gain, and — here’s an important point — you set-and-forget them. When you are mixing, you mix from the channel faders so that they push the compressor into gain reduction and give you that smooth push and pull that you want from each group. Start with the compressors at unity, and if you compress heavily use the make-up gain to get back to unity.
So, what does this do for you? For one thing, it lets you use the compressor of your choice for each instrument group so you don’t have to “settle” for a compressor that you like on one group of instruments but not for another. This helps avoid some undesirable artifacts of compression.
Let’s suppose you push the kick and snare into compression. The bass will get compressed too because it’s on the same bus, creating a tight rhythm section with that nice pumping sort of thing that you get when low end triggers compression. Good news: the vocals will not pump up and down because they are on a different bus. Conversely, when you push the lead vocal fader into compression on Groups 5 and 6 it won’t affect the volume level (or the compression characteristics) of the Drum and Bass group. In fact, pushing the lead vocal could serve to duck the background vocals, which can be a good thing.
Don’t confuse this technique with parallel compression. When using parallel compression, the drums (or other instruments) are sent directly to the mix in addition to a compressed bus — via either an aux send and return, or by assigning the channels to a subgroup as well as to the Main L/R bus. For example, if you want parallel compression on your drums, route all of the individual drum channels to the Main L/R mix and to another stereo bus such as Groups 1 and 2. A compressor is inserted on those groups, and the groups are assigned to the Main L/R mix. You can then mix the compressed drums with the original uncompressed drums.
Trial and Errors
Parallel compression can cause latency in a digital desk because there are two different paths for the same signal. The compressor plug-in could be delayed by a millisecond or two (of processing time) relative to the drum channels that are assigned directly to the Main L/R bus. This latency can cause comb filtering, which makes the drums sound hollow, with the overall effect being as if you are listening to them through a tube — a cardboard tube, not a vacuum tube!
You may need to experiment with how to group your instruments, but I’ve found that Drum/Bass, Keyboard/Guitar and Vocal groups are a good place to start. If you don’t like the results, you can always go back your normal workflow.
Steve “Woody” La Cerra is the tour manager and front of house engineer for Blue Öyster Cult.
