Last month, we investigated reverb parameters called diffusion and density. The audibility of making changes to these parameters can be greatly influenced by another parameter called damping, which you’ll find in a large percentage of software and hardware reverbs.
Why Is It So Damp Outside?
When sound travels through the air, the high frequencies are attenuated. We’ve all experienced this when using a P.A. system outdoors — listen to the P.A. from 25 feet away, and it sounds balanced; move back 100 feet, and the P.A. sounds dull. This is mostly due to the fact that high frequencies have shorter wavelengths and reduced energy relative to low frequencies. It’s easier to hear this attenuation outdoors because there are, typically, fewer reflective surfaces are present to reinforce the high frequency’s energy. If you listen to the same P.A. indoors and the room has hard surfaces such as tile or concrete, the HF reflections will last longer than if the walls are covered with, say, absorptive panels. In general, reverb tails lose high frequencies when they bounce off soft surfaces.

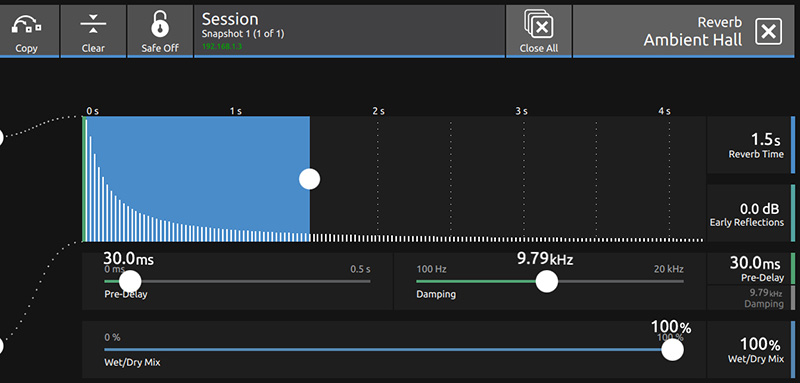
A reverb’s damping parameter is designed to mimic this phenomenon. You’ll typically find a frequency setting or a numerical value for damping, but some reverbs provide both (you may even find an LF damping parameter). If damping is adjusted using only frequency, then you’ll be able to set the frequency above which damping starts, but you won’t be able to change the intensity of the damping. Fig. 1 shows the Ambient Hall reverb from the DiGiCo S-Series effects rack. In this example, the damping has been set to 9.79 kHz.
If damping is set using an arbitrary number, a higher value will simulate more high-frequency absorption, and a lower value will simulate less HF absorption. If you like your reverbs to be bright with lots of sizzle, then dial down the damping number. As you increase the damping value, the HF response of the ‘verb will become smooth and warm, but note that setting the damping too high will make your reverb sound dull. And that’s a problem because…
Keep It Clean!
One of the things I frequently hear in mixes created by inexperienced engineers is excessive reverb, or reverb that doesn’t work within the context of the mix. Part of the problem is not paying enough attention to a reverb preset when it’s loaded, or not being able to really hear what the reverb is doing, because it’s masked by the instruments. In the studio, this is easy to isolate: you can start and stop the DAW (or tape!) abruptly. That will allow you to clearly hear the reverb tail and its frequency response characteristics. You might be surprised at how long and boomy that reverb on your lead vocal has become.
In a live situation, reverb is more difficult to isolate and assess due to the random chaos that is most sound checks. One possible approach is a virtual sound check where you can listen to (for example) only the snare drum or the lead vocal in the P.A., and fine-tune the reverb parameters while no other instruments are playing. A patient drum tech might help you by smacking the snare for a few minutes while you dial in your reverb settings — but keep in mind that you’ll also be hearing natural room reflections (unless you’re outdoors, in which case you can instead worry about the 500 mS slap coming off the side of that warehouse across the road).
The frequency extremes of reverb are critical. Let’s suppose you have a reverb with a decay time of 1.5 seconds on your snare and toms. That’s a good starting point, but as discussed in Part 1 of this series, you also need to pay attention to what’s happening in the low frequencies. If the LF multiplier is 2, then the reverb decay in the low frequencies will be three seconds. Unless we’re talking about a slow tempo ballad, that’s way too long for my taste, and that ‘verb is going to take up too much space in the mix. I usually set the LF multiplier to 0.3 or 0.4 and roll off the low-end below 300 Hz.
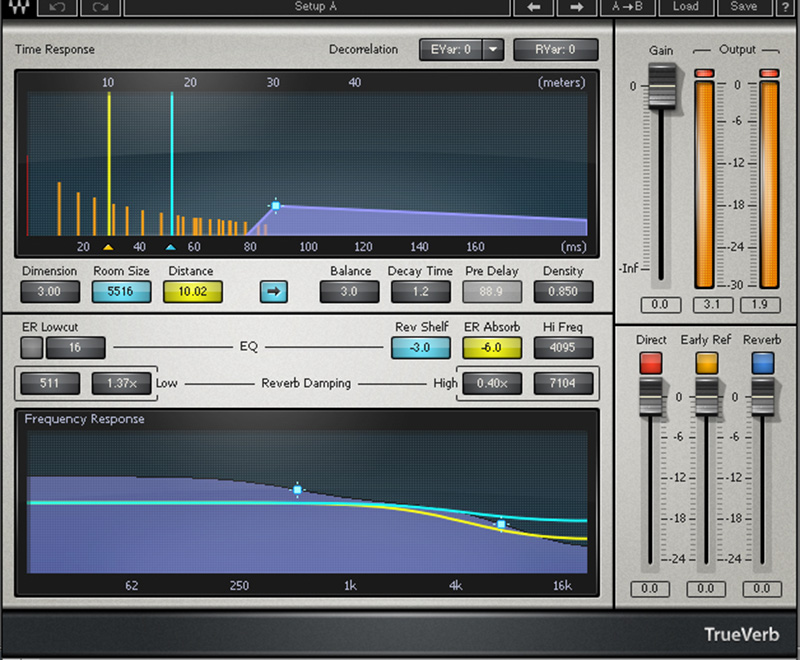
Fig. 2A shows Waves TrueVerb. There are a few things worth noticing. The direct level is raised up all the way and, as mentioned in Part 2 of this series, you shouldn’t need any direct sound in your reverb. The early reflections are also raised up all the way, making the snare sound closer to the listener than it needs to be. The damping settings favor the low frequencies, giving this ‘verb a dark sound. If a reverb is dark, you’ll tend to add more of it, and that can make your mix sound muddy.
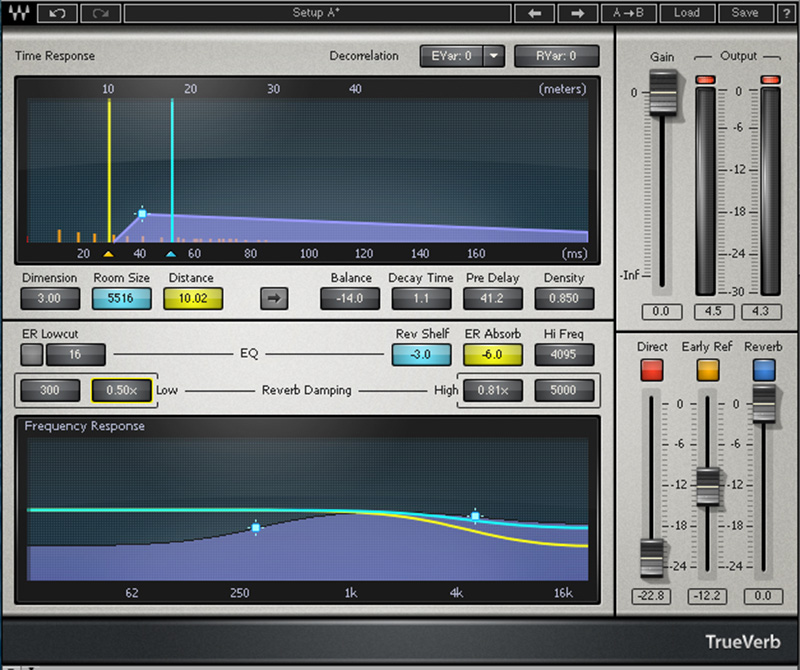
Fig. 2B shows TrueVerb with different settings. This time, the direct sound has been completely removed, and the early reflections are reduced to about 50 percent. The LF damping has been set to 0.50 at 300 Hz, and the HF damping is set to 0.81 at 5,000 Hz. I know what you’re thinking: “the high frequency response is rolled off at 5,000 Hz? That’s way too low.” I promise you that it’s OK. In fact, it’s better than OK. The reverb will produce a crisp room emulation from the snare drum without being sloppy in the low-mids or splashy in the highs. Real reverb doesn’t usually have an extended high-frequency response anyway, except in the most reflective of rooms — and neither should your reverb effects.
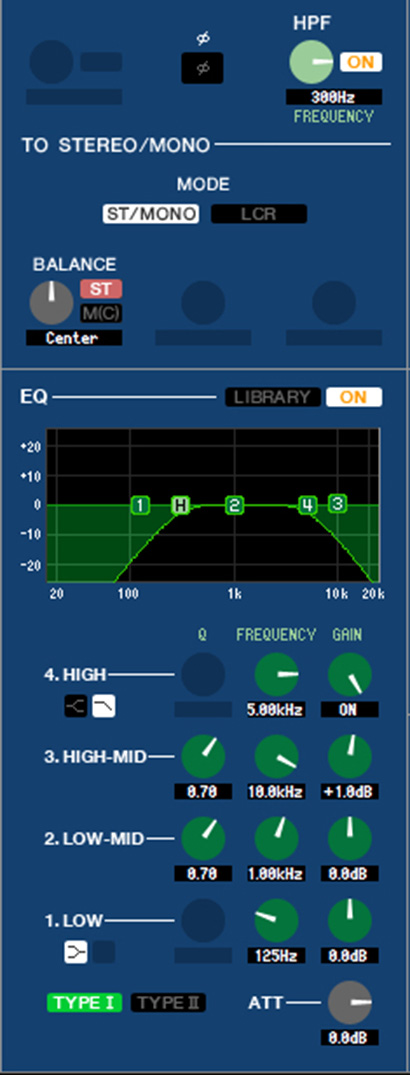
Fig. 3 shows the EQ I use for my reverb return on a Yamaha M7. At the top of the window, note the high-pass filter set to 300 Hz. The High EQ band is a low-pass filter set to 5,000 Hz. Just in case I didn’t kill those frequency extremes the first time, I’ll kill them again with the EQ. Someone once told me that adding reverb is like adding another instrument to the mix, and I believe them. If I add reverb, I want it to occupy a very specific space in the mix without stepping on the other instruments.
Damping lets you modify the decay and response curve of the high-frequency portion of the reverb tail, and helps simulate what happens to reflected sounds in a real acoustic environment. Some manufactures may refer to damping as contour but regardless of what it’s called, careful attention to reverb damping will help your mixes sound better.
Steve “Woody” La Cerra is the tour manager and Front of House engineer for Blue Öyster Cult.
