Compression is probably the type of processing most often used for live sound applications, and you’re probably aware that compression can be used to control the dynamic range of a signal. Applying compression requires a bit of care because overdoing it can suck the life out of a performance, or change the timbre of an instrument in an undesirable way. For example, fast attack times on a compressor can reduce the HF content of a sound, and high compression ratios combined with quick release times can produce distortion.
Serial or Parallel?
Most of the time compression is used for serial processing in live applications — meaning that you run the signal through the compressor, and 100% of what you hear has been compressed. This is different from the parallel processing we normally use to apply reverb and delay, where you have a dry signal routed to the L/R mix bus, and use an aux to send that signal to a reverb (or delay), which comes back to the L/R mix bus as a separate “wet” signal.
Parallel compression can be really interesting when applied to drums as it allows you to heavily compress drums for consistency or special effect, and then add the compressed signals to the uncompressed drum channels. You can create some really interesting sounds with this technique by intentionally distorting a drum kit and mixing the distorted drums underneath the “normal” drums (for a more detailed explanation see “Theory and Practice” in the July 2011 issue of FRONT of HOUSE at plsn.me/FOH-PC.
Parallel compression is one of the few mixing techniques that was easier to create in the analog domain because there’s no latency in an analog mixing system. You double assign the drum channels to a subgroup and directly to the L/R mix, and insert a compressor on the subgroup. Sound from that subgroup arrives at the L/R mix bus at exactly the same time as any drum channels that are assigned direct to the L/R mix bus because there’s no processing delay when inserting an analog compressor in an analog mixer.
The Digital Downside
Attempting that same technique with a digital mixer often results in latency, due to two reasons: (1) It takes a small amount of time for the subgroup to be processed by the compressor, whereas signals assigned direct from a channel to the L/R bus do not experience that processing delay, and (2) Routing the drums through a subgroup or aux bus increases the length of the signal path compared to the channels that are assigned direct to L/R. The delay may be as small as a millisecond, but when you combine the original signal with the compressed version, you’ll hear comb filtering (a hollowness or flange-type sound) which makes an instrument sound weak in the mix — or worse, changes its frequency response.
Delaying the channels by a certain amount of time is not going to solve the issue because delaying a channel also delays its send to any mix bus. Back to square one.
The Solution
The solution is kind of a fake-out: un-assign the channels from the L/R bus, and simultaneously route them to two different mix buses. Leave one mix bus uncompressed and compress the daylights out of the other.

You can do this on any digital console with aux, group or other mix buses that can be assigned to the L/R bus. We’ll use the Midas Pro2 as an example. First, assign the drum channels to the L/R bus (“ST”) and send them to auxes 1 and 2 (see Fig. 1). A good starting point for the send levels is unity gain. Set the sends pre-fader so that you’ll get compression even when the channel faders are at low levels. We’ll call the unprocessed drum bus Drums and the compressed drum bus DrmCmp.
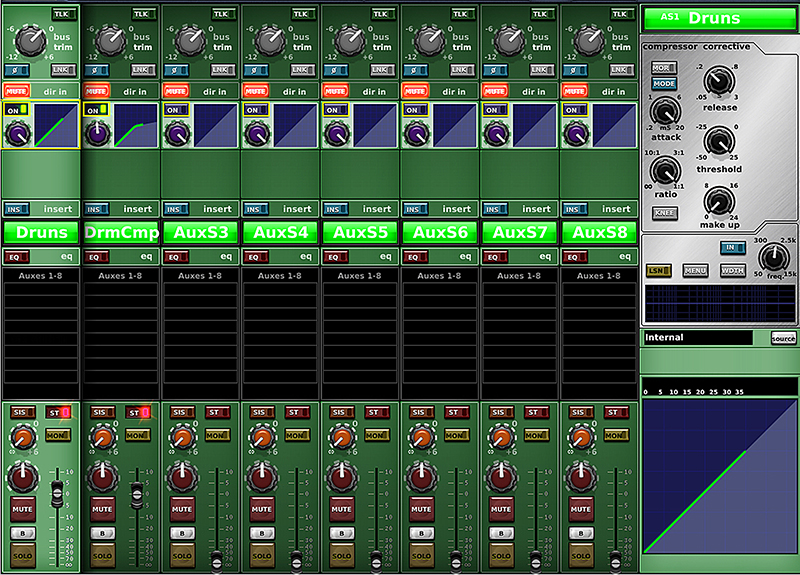
Fig. 2 shows auxes 1 and 2 on the left. Note that they are assigned to the STereo bus, and both have the compressor turned on. Compression settings for the Drums bus are shown on the right side. The compressor is turned on, and set for the highest threshold, the lowest ratio, and slowest attack settings possible. At those settings, the compressor should not be doing anything.
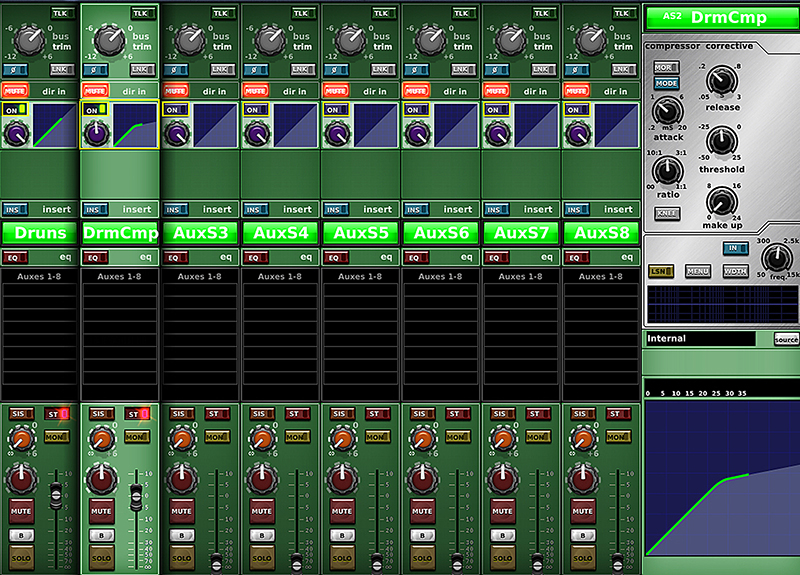
Fig. 3 shows the compressor settings for the DrmCmp bus. The threshold is set low, the ratio is high and the attack is fast — settings that are almost guaranteed to produce aggressive compression.
While you’re mixing, raise the fader for Drums, then raise the fader for DrmCmp. As you bring up the fader for DrmCmp you won’t hear any comb filtering, flamming, or flanging because the signal path from the channels through the two aux buses to the STereo mix bus is identical.
When using a console that provides different types of compressors or allows you to insert plug-ins, it’s important that you use the same type of compressor on both mix buses because different compressors may produce different latency. It’s also worth noting that some digital mixing systems have automatic delay compensation, a feature that makes unprocessed channels “wait” for processed channels.
Once you have the nuts and bolts sorted out, you can move on to the creative aspects of parallel compression. Use aux 2 to compress or distort the drums and mix them with the uncompressed drums to add presence and consistency in the mix, or revisit the New York Compression Trick (NYCT, discussed in July 2011 T&P) to add bottom-end boom and top-end snap to the compression bus.
Steve “Woody” La Cerra is the tour manager and front of house engineer for Blue Öyster Cult.
