Anyone who reads FRONT of HOUSE is probably familiar with the differences between serial processing and parallel processing. Serial processing is used when we want 100 percent of the signal to be processed and none of the “original” signal to be allowed into the mix. For example, when compressing a lead vocal, we most often insert the compressor on the lead vocal channel in an effort to control the dynamics of the lead vocal. This prevents the uncompressed lead vocal from reaching the mix.
On the other hand, applying delay to that same vocal channel is usually a parallel process, meaning that the lead vocal will be split to two paths: one is the original channel “dry” vocal and the other is a send to and return from a delay (the send serves to split the signal). That delay is added alongside the dry signal and mixed in to taste. The general rule of thumb is that serial processing via inserts is used for dynamics and EQ, while parallel processing with an effects send/return is used for time-based effects such as delay or reverb. [For a complete refresher, refer to
“Theory & Practice” in the June and July 2011
issues of FOH, which explain the topic at length.]
Squeezing the Snare
Take, for example, the use of compression on a snare drum. Normally, we compress a snare drum serially, using an insert. After all, isn’t the idea of compressing a snare drum to control the dynamics? So why would you want the original uncompressed snare drum sneaking its way into your mix? If you do, then the dynamics are not really being controlled.
The truth is that there are far more interesting sounds that can be created through extreme processing out of the normal boundaries. In our snare drum example, we could apply a compressor with a low threshold, high ratio, a medium attack and a quick release. This will give you a nice thwap out of the drum that you might not appreciate — until you mix it in with the original uncompressed drum. That’s where parallel processing shines. By adjusting the compressor’s attack and release times, you could emphasize the snares and sustain of the drum (short release), or completely crush the initial transient (short attack). The point is that there are ways to mutilate the snare that might not be useful alone but are useful when mixed in underneath the original snare.
There are a lot of ways to do this, depending upon the nature of the console. When I was using analog consoles, I’d double-bus my overhead mics to the L/R bus and to a subgroup, compress the daylights out of the subgroup, then mix the squashed subgroup in with the “normal” overhead channels. Depending upon the compressor settings, I could get a subtle effect, such as smoothing out cymbal crashes, or a severe effect, such as getting the cymbals to pump, creating an aggressive cymbal sound. This squashed version was mixed in underneath the “dry” signal.
Routing becomes more tricky in the digital world, because with some digital desks — if you route the way I just described — you’ll hear flanging or phase issues between the original channel and the processed group. This is caused by plug-in latency (the few milliseconds it takes for a plug-in to process audio). Latency can result in comb filtering or phase cancellation, particularly when the plug-in for one channel is different from the plug-in on another channel, because latency varies with the type of plug-in.
A Real World Example
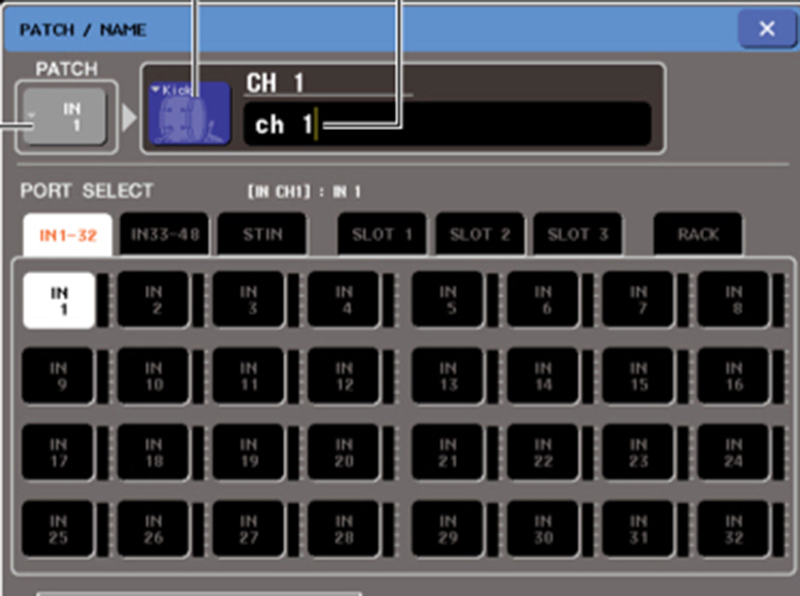
One way to avoid the latency issue is splitting the original signal to multiple input channels. Last night, I was mixing on a
Yamaha M7CL, a console that makes it easy to parallel process. You simply assign the same input source to more than one channel. See the M7’s Patch page in Fig. 1, which shows Input 1 assigned to Channel 1. You’re patching the same microphone to two separate channels.
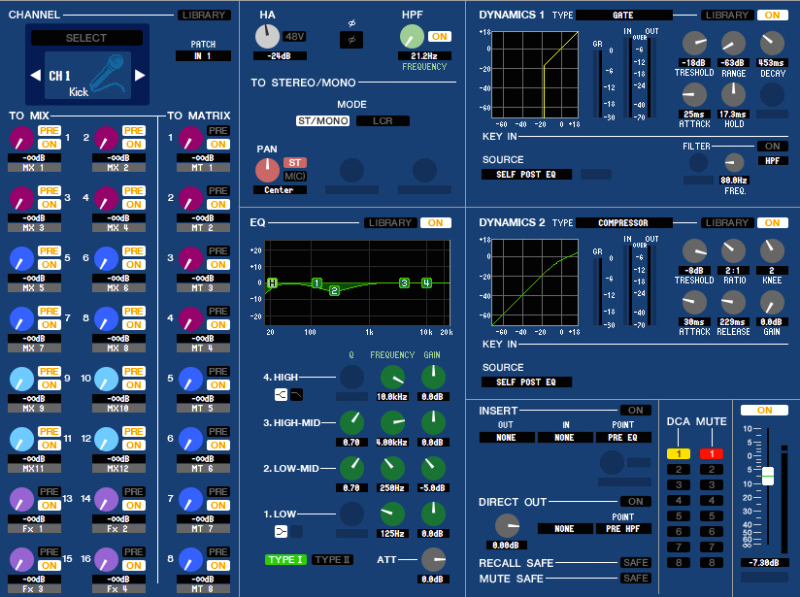
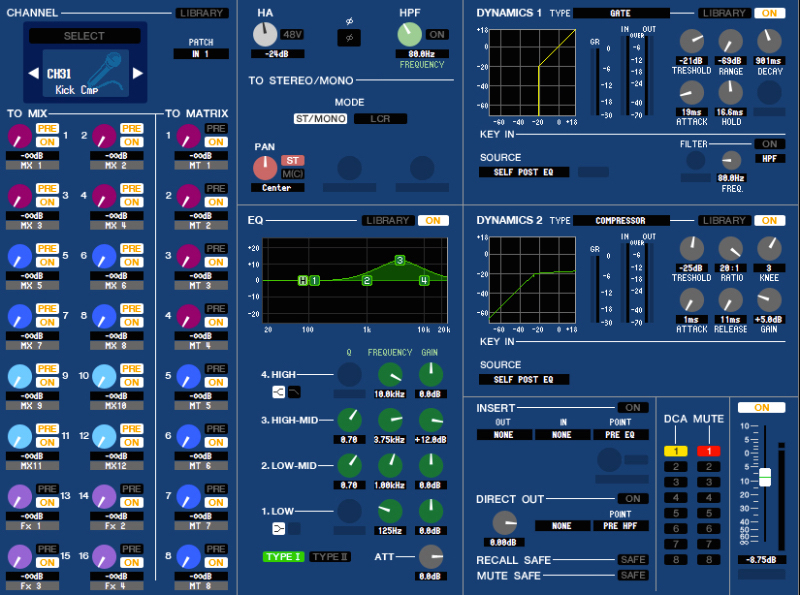
I labeled those channels Kick and Kick Cmp, and both channels are assigned to the L/R mix. The “normal” channel gets a bit of compression to tame the peaks like you’d normally do. The Cmp channel gets squashed with something like 20 dB (or more) compression. Such severe compression will likely change the timbre of the drum, so I’ll EQ the Kick Cmp channel very differently than I would EQ the dry kick channel. The screens shown below are from Yamaha’s Studio Manager Software for the M7. The “normal” Kick channel has fairly typical processing with a bit of EQ and compression (Fig. 2) but the Kick Cmp channel (Fig. 3) has very aggressive compression and EQ. A fast attack (1 mS or less) and release (under 10 mS) will give you a nice rubbery attack on the beater, and elongates the decay of the drum. While the processing for the Kick Cmp channel looks weird, it sounds great. Remember, it’s being mixed in with a more traditional sound. To shake things up, you can try swapping the order of EQ and compressor in the signal chain; but not all consoles allow you to do that.
When using such drastic compression, it’s important to gate the kick or snare microphone before you compress it. Why? Because a high amount of gain reduction will make leakage very audible when the drum stops and the compressor “lets go” of the gain reduction, returning the channel’s gain to normal. When the channel level comes back up, leakage from whatever sound sources happen to be nearby the microphones will be emphasized. Gating the channel before the compressor will reduce or eliminate that issue. I suggest you try it. You can always turn it off if you don’t like it.
Steve “Woody” La Cerra is the tour manager and front of house engineer for Blue Öyster Cult.

