Suggested EQ for Common Sources
One of the most important tools we use on a regular basis is EQ. Sometimes we use it to correct problems, and other times we use it creatively. It’s worth taking a look at some techniques for applying EQ to common input channels. The photos below were taken from the screen of a DiGiCo SD10 mixing console. Keep in mind that EQ is, of course, intimately tied to the quality of the source as well as microphone selection, so these are just starting points. YMMV.
The Midrange Bulge
One of my colleagues eloquently described the oft-encountered mix issue in the lower-mids as “the midrange bulge.” Not to be confused with what is happening to some of us as we age, the midrange bulge refers to the huge amount of energy present in the lower mids of many mixes. A lot of instruments have strong fundamentals in this region, among them drums, piano, synths, guitars and lower-range vocals. As a result, the instruments fight for space in the mix, and they sometimes step on, or “mask,” each other.
Drums

One solution is carving out some of the low-mid frequencies on each channel so that instruments don’t step on each other. Take a look at Fig. 1, which shows a fairly typical EQ curve for a kick drum mic. We have a -12 dB cut around 330 Hz, which helps make room for the bass and some of the guitars, and a +4 dB boost near 4 kHz that adds presence in the mix. The curved red line on the left of the EQ is a high-pass filter set to around 30 Hz. This helps prevent the kick from getting sloppy in the lowest octave (or in severe cases, from generating low-frequency feedback from the P.A.). What you cannot see is that there is an aux send from the kick channel feeding the subwoofers, so even though there is no boost in the bottom end — a typical EQ move for most engineers — the feed to the subwoofer acts as a sort of low-frequency EQ.

Fig. 2 shows the EQ I used a few nights ago for snare top using a Shure SM57 on a Beier Drums 1.5 Steel Series Snare 6.5×14 (awesome drums. Check them out at beierdrums.com). This drum has great balance and plenty of meat in the region between 200 and 300 Hz; in fact, I sometimes need to reduce that attribute to leave room for vocals and guitars. Again we have an HPF, and a cut in the area of 300 Hz. The boost around 6 kHz puts a little sparkle into the snare attack, and makes sidestick cut nicely through the mix.
Keep in mind that what you see on a screen doesn’t always equate with what you hear; it may look like a lot of EQ but it actually sounds pretty subtle. Also keep in mind that this will change with snare tuning and the age of the head [Note: on the right side of this EQ graph, you’ll see a red curve denoting a low-pass filter. It is bypassed, as indicated by the blue shading above the LPF curve].

Fig. 3 shows the EQ on a rack tom channel, also exhibiting a cut in the lower midrange, this time closer to 250 Hz. Cutting in the area between 200 and 300 Hz can help toms speak more clearly, reducing the “cardboard box” tone that toms sometimes produce. The boost in the upper-mids near 3.5 kHz emphasizes the stick on the head and provides articulation for tom fills. A bit of HPF is intended to keep excessive low-end energy under control. The HPF is set to roughly 25 Hz.

At the other end of the frequency extreme, Fig. 4 shows EQ for one of the overhead microphones. Most notably, there’s a high-pass at 344 Hz intended to reduce low-end bleed from the bass amp and prevent rumble from the stage sneaking its way through the mic stand into the microphone. There are two distinct philosophies when it comes to EQ’ing overheads. The first is whereby the overheads are essentially intended to capture the cymbals — so feel free to cut out the low-end using a low-frequency shelf cut or a high-pass filter, as shown in Fig. 4. If you have close-mics for kick, snare and toms, those mics are already providing the “meat and potatoes” for those sounds, so you may not really need the overheads to do anything more than reinforce the cymbals.
On the other hand, some engineers base their drum sound around what the overheads are capturing and add the close microphones as spot mics. This is fairly common in the studio but can be used in live situations for jazz where you want the drummer creating their own mix, and you add the kick and snare mics for a bit of push — but you are not building a mix the way you would in a rock, R&B, pop, country or rap situation. If you decide to run the overheads full spectrum, you should at some point during sound check crank the overheads way higher than you think you’ll ever need during the show to make sure that you won’t cause any feedback with the house P.A. (better safe than sorry).
Organ
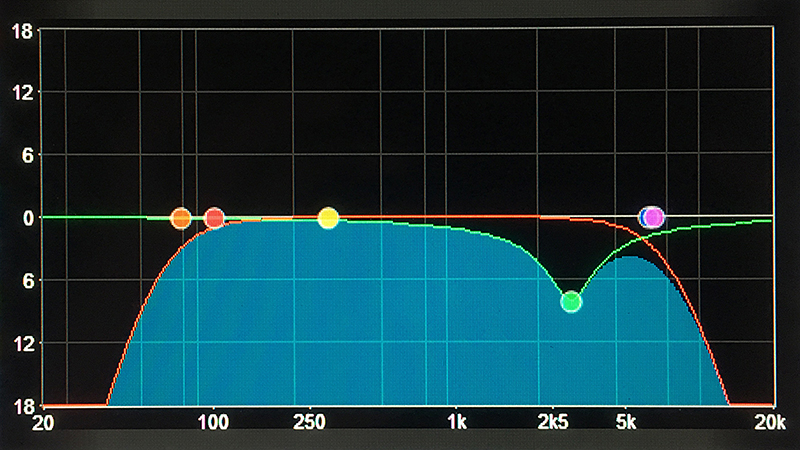
Fig. 5 shows the EQ I use on a Hammond XK2 electronic organ. I find that this EQ also works well with the Hammond XK3 and XC1, due to the way they are voiced. At certain drawbar settings, some of the notes on the upper half of the keyboard can screech enough to take off your head. The notch at 3 kHz helps tame this. The HPF starts to roll off around 100 Hz, and I might change that depending upon the song and how much real estate the organ needs in the mix. For example, in “…Reaper,” I’ll allow more low-end out of the Hammond because it’s intermittently used for chord swells. When the P.A. is harsh in the area around 3.15 to 4 kHz, I may make this notch on the Hammond more drastic, even after pulling some of those frequencies out of the house EQ.
Vocals
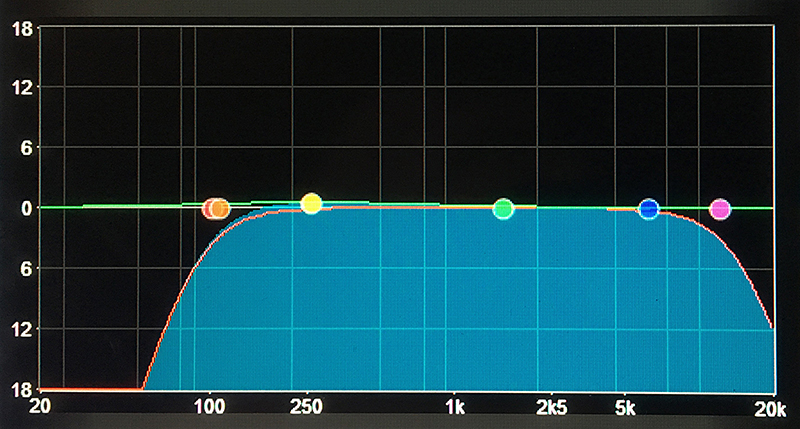
Finally, we see the EQ (or lack thereof on this particular evening) for a lead vocal channel in Fig. 6. Notice that the low-pass filter is turned on and set at 12.3 kHz. This downplays leakage from cymbals when the singer backs off the mic or sings softly and helps keep the vocal microphone from becoming another overhead mic. The high-pass filter is set to 107 Hz, which helps reduce popping and breath noises without thinning out the vocal sound. Depending upon the P.A. system, I might add or subtract a few dB in the vicinity of 3.5 to 4 or 5 kHz to either help the vocal cut the mix a bit better (boost) or tame (cut) the vocal in a bright P.A. Aggressive compression can sometimes make a vocal dull, in which case I’ll look to boost this region a few dB to restore the breathiness of the vocal.
When EQ’ing background vocals, I’ll often use more severe high-pass filtering, up as high as 200 Hz. Dumping some low-end from the background vocal mics helps the background vocals sound more coherent and distinguishes them from the lead vocal. The good thing about trying all these ideas is that if you don’t like them, you can always reset the EQ and start again — usually at no extra charge!
Steve “Woody” La Cerra is the tour manager and front of house engineer for Blue Öyster Cult.

